
In December of 2021, I got a new job. Having spent the past decade of my life working for my now-former boss, I was faced with the difficult task of finding a fitting parting gift that would serve both as a marker of the “end of an era” for both of us and a symbolic encapsulation of myself and my experience working there over the years.
An obnoxiously-flashing, WiFi-connected, talking panic button that sends alert emails to random employees seemed most appropriate
Before I get to the good stuff, a little more background info: the auction company I worked for was small—as in, well under a dozen regular employees, only one of which was full-time (the owner/my old boss). I started there in high school working once a month or so as-needed, mostly simple work that pretty much anyone with a pulse could do. Over the years, my roles and responsibilities evolved alongside the company, accelerated by the COVID-19 pandemic and accompanying shift to online operations. The relevance of my computer skills steeply increased and I took on more (and even more-varied) roles in the business. I worked as often as I could through my last few semesters of college, including days when I’d have just one class right smack in the middle of the morning (which I’d clock out for and log into on my laptop). However, despite my newfound relevance (and thus, interest in the work), the antiques business has never been my cup of tea. After graduating in May of 2021—in a move that surprised exactly no one—I let my boss know that I would be ramping up my job search efforts (read: it’s time to start figuring out how to replace me).
The next 7 months saw three complete auctions, and most of the setup work for a fourth. I continued to work on a “perpetual 2-week notice” basis and did my best to line things up to ensure the smoothest possible transition when I inevitably found “real” work. As part of this effort, I wrote a number of small utility programs to automate or otherwise facilitate processes that I was (at the time) uniquely qualified to perform. Despite this, it was becoming increasingly apparent that there was no way I could realistically code a full replacement for myself without years of dedicated development time & substantial advancements in the fields of AI and robotics. So when I got the offer for the new job, I knew times would probably be tough at the auction company for a while after I was gone.
Enter: The Panic Button
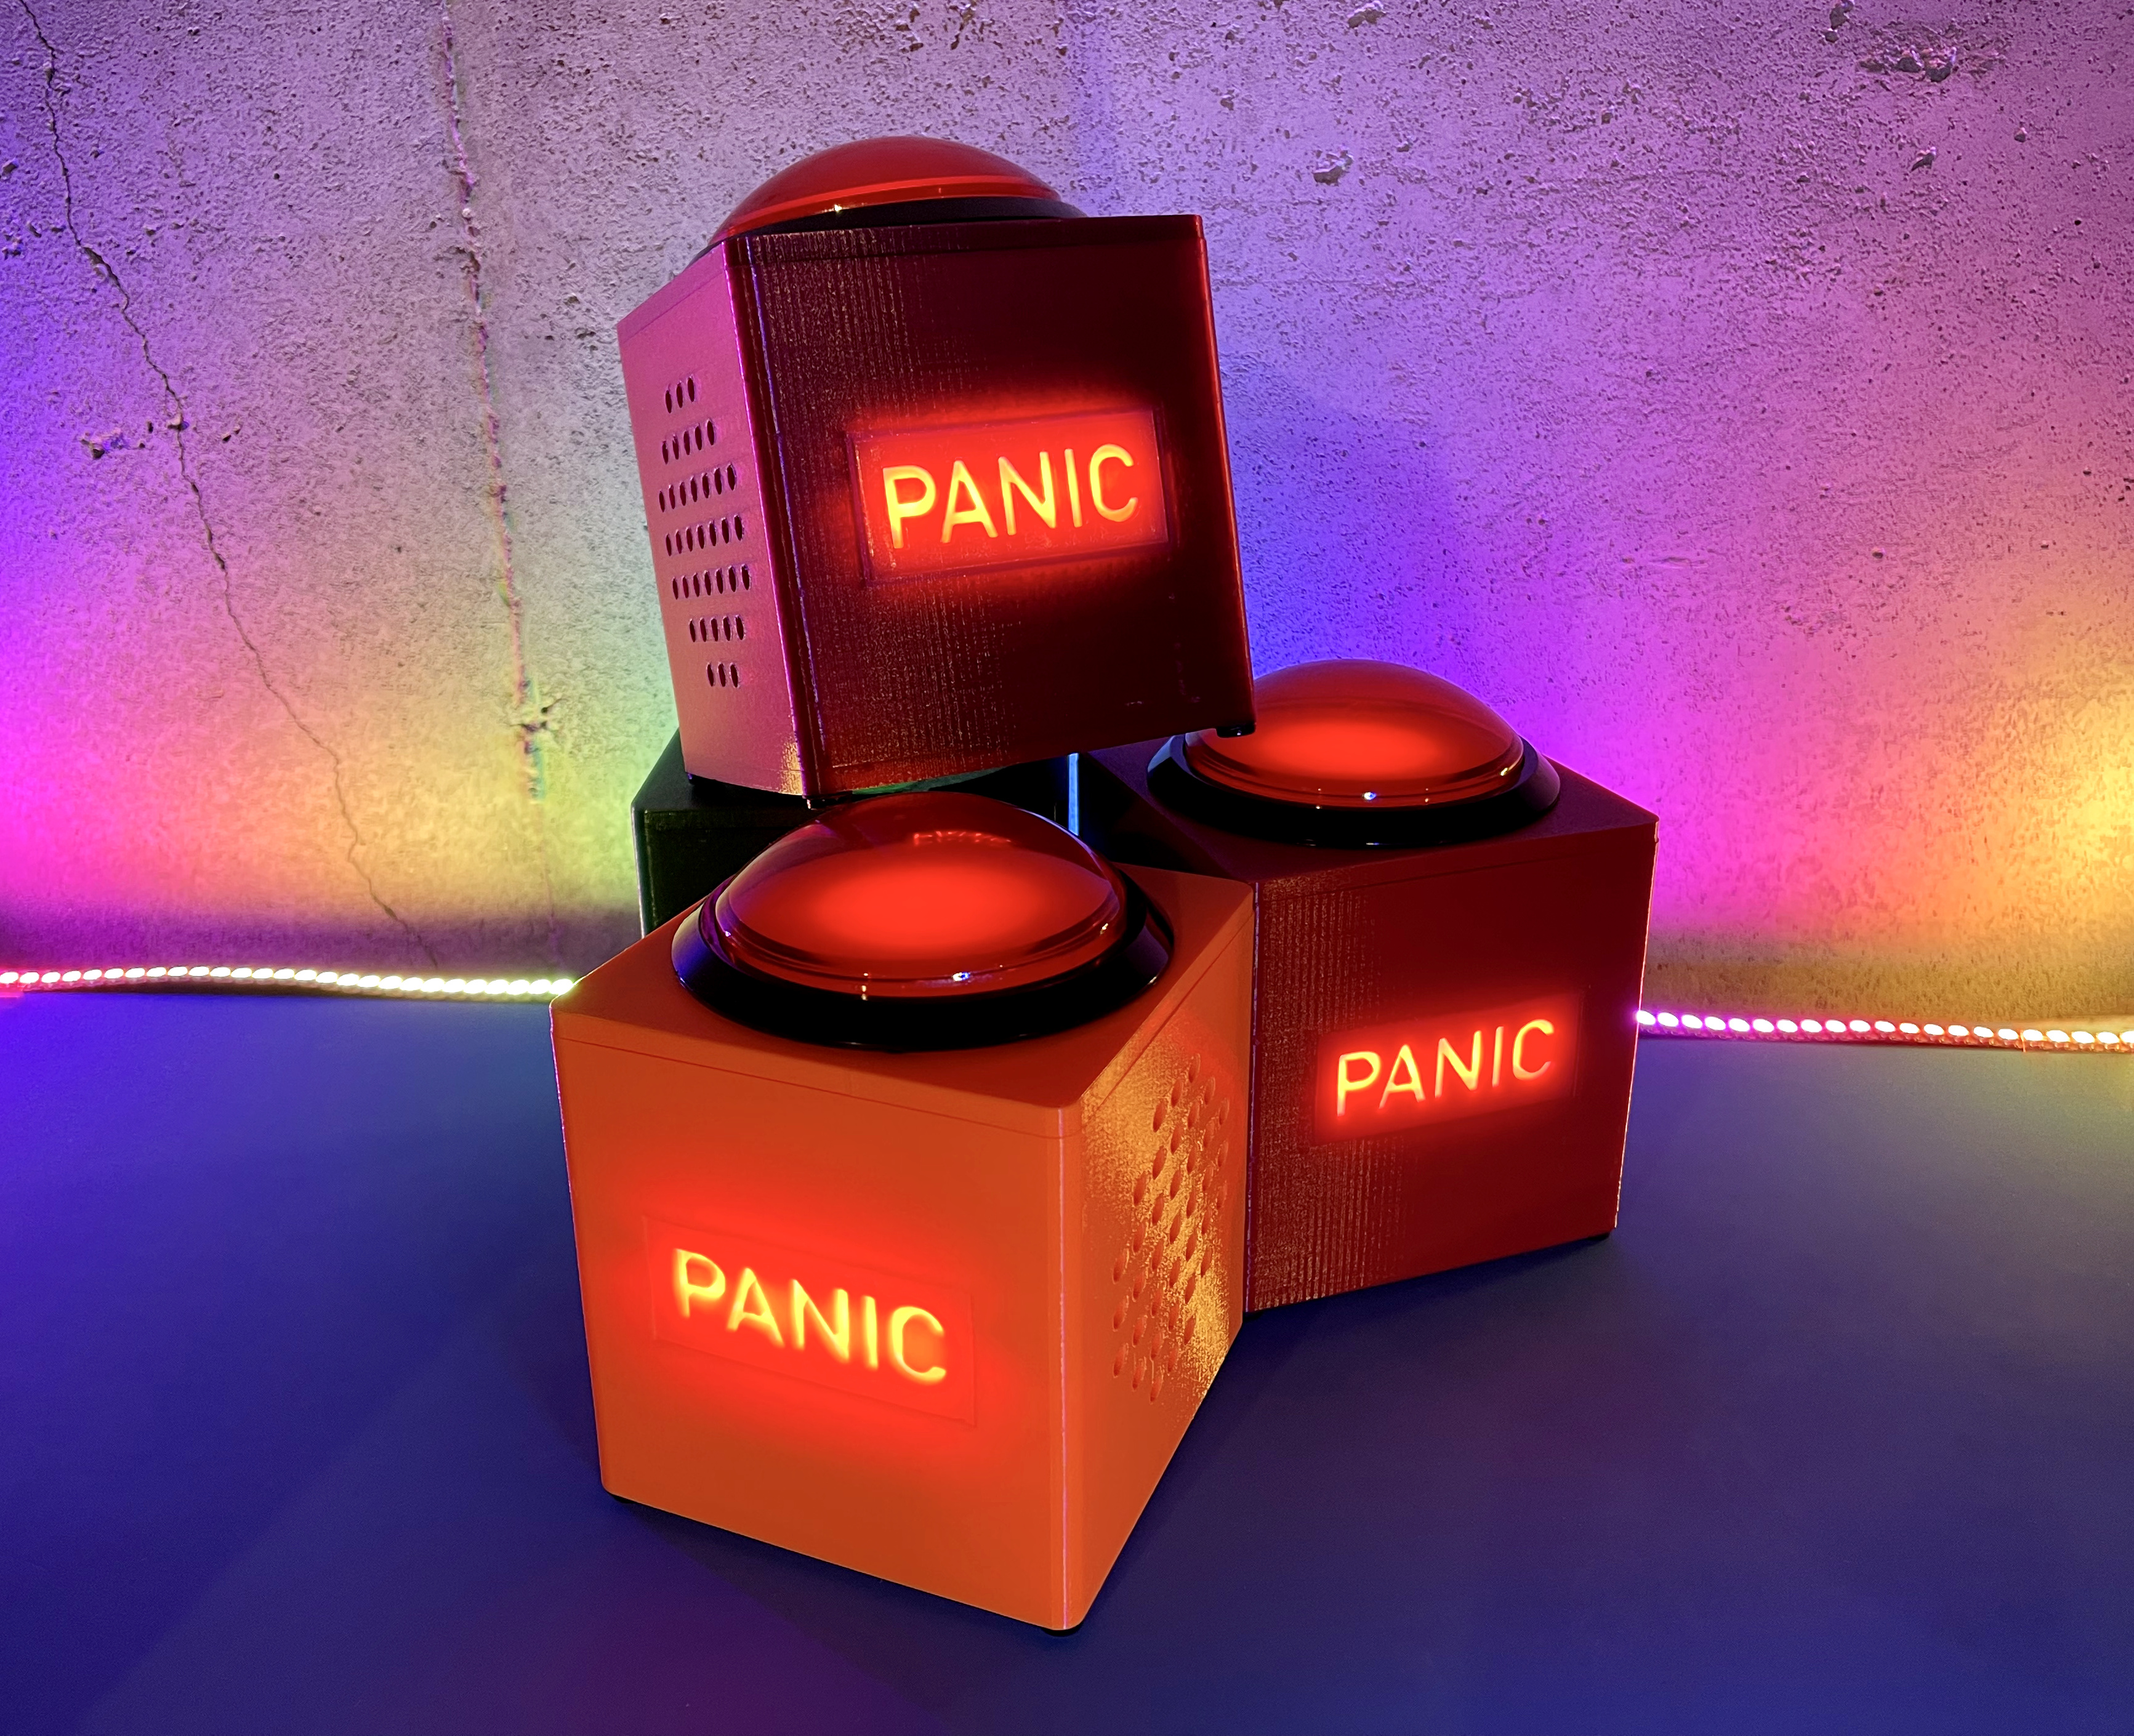
To be clear, the idea for the panic button was not dreamt up overnight or in just a week or two; I’d made offhand jokes about my boss’ apparent need for one many times in the past and had casually contemplated what I might want that imaginary button to be like. My mental prototype was loosely based on the Staples Easy button1, though I knew I wanted something a little spicier than that. At its core, my panic button is essentially a suped-up Easy button: there’s an audio module you can load whatever sounds you want onto and stereo 3-Watt speakers, so it’s much louder than the Staples button. Arguably the most important component in the entire assembly is the button on top, and I spent a lot of time debating what exactly I wanted to put there. The obvious choice would be a large Easy-button-esque opaque red button with “PANIC” written in bright block letters across the surface, but curiously I was unable to find a product matching that exact description. My next thought was one of those industrial, emergency-stop red mushroom-looking buttons, but they all seem to be either a) complete modules, rather than easily-mountable parts or, more commonly, b) have a lame arrow graphic on top of them. Eventually I settled on an arcade button, but many of those are too small and not satisfying enough to press; maybe if I was building a “slightly elevated level of anxiety” button, a smaller arcade button would suffice. No, this project demanded something large & colorful, with a satisfying amount of travel, and Adafruit’s 100mm Massive Arcade button was as close to perfect as I was going to get.
The rest of the hardware was more or less chosen out of necessity. I wanted the button to be able to connect to WiFi, and DFRobot’s FireBeetle is my favorite board at time of writing so that was pretty much a no-brainer. It has an efficient regulator, reasonably compact footprint, and is a bit higher quality than many of the cheap Chinese ESP32 clone boards out there while still being very affordable. The audio module (also from DFRobot) runs at up to 5V2, so I powered it directly from the batteries/VCC. Because I was fairly sure the audio module’s serial communication pins would operate up to the provided input voltage, I added a level shifter to ensure the ESP32 didn’t get fried. Because the ESP32 isn’t exactly known for its ultra-low-power performance and because the panic button doesn’t need to do anything except for a few seconds after it’s been pressed, I added a soft-latching power circuit to connect the batteries to the rest of the circuit when the button is pressed. Then, after doing its thing, the ESP32 sends a pulse to the “OFF” pin on the latching circuit which cuts power to the board. Based on some extremely rough napkin-math, I’d estimate a set of three Ultimate Lithium AA batteries should be able to provide at least 1000 panic button presses (including sound, email sending, blinking lights, etc.). I chose lithium batteries for their higher voltage3 in order to get the most out of the audio module which can play louder & cleaner with more volts. Despite both the FireBeetle and the audio module only being officially rated up to 5V, I haven’t seen any issues with the additional 10%.
That’s all very nice, but what does it do?
When the panic button is pressed, the circuit fires up and the ESP32 starts blinking the button’s LED as well as the row of LEDs on the front of the core that backlight the “PANIC” lithophane. At the same time, it increments an internal counter in order to keep track of the total number of times the button has been pressed in its lifetime. Following these two actions, the ESP32 sends a serial command to the audio module to play a certain file stored in its memory (an audio clip of actor Henry Czerny flipping out at another character in the excellent 2019 movie Ready or Not). From there, the ESP32 is hands-off as far as the audio module is concerned (it actually doesn’t even know when the sound has finished playing, which is part of the reason I only included a single audio file). While the audio module is playing, the ESP32 is busy connecting to WiFi and sending emails.
Ok, now pay attention, this is the fun part! The emails the button sends are fairly simple: basically just some bright-red heading text that says “[Boss’ name] is panicking!”. Or rather, that was the original plan. While writing the code, I decided it would be more fun to add some variety, so I defined an array of 10 different messages (varying from alternative ways of phrasing the message above, to unrelated but deep-cut inside jokes) that the button will randomly select from each time it’s pressed. Additionally, I defined another small array of recipients—other employees who worked there the most often—that the button would randomly pick from each time. Finally, I set it up so that the chance of the button sending an email to one of those other employees was only about 20%. However, it sends me an email every single time it’s pressed containing the chosen message, total number of button presses to date and, if it happens to send to one of the employees, which recipient that is. Oh, and as a bonus, the email is sent from “PanicButton@[AuctionCompany].com”.
At this point, you may be wondering why I included a press-counter. Sure, it’s a fun statistic and relatively trivial to include in the code, but why bother? Well, even with the low 20% chance that the button would email one of my former coworkers the first time it was pressed, I was concerned that such an event would ruin the surprise. So I implemented the press-counter & wrote a check around the email-sending code that prevents an email being sent to anyone but me until the counter exceeds 30 presses. This means that until (at least) the button’s 31st press, I will be silently receiving emails each time it’s pressed and, as mentioned before, those emails will report how close the count is getting to 30. Perfection.
Some things I wish I’d thought of earlier
This project came together, quite literally, just in time; while I’m really happy with the way it came out, there are a few things that would have been nice to include in hindsight:
- First and foremost, it would’ve been fantastic to include more than one audio clip. I think a few that get rotated through at random would’ve been fun, with some special ones reserved for “press milestones”. Since we’re counting the number of presses, it would’ve been easy to have a certain sound play at 50/100/150/etc. The main hurdle to implementing this (besides time constraints) was the need to maintain a parallel array of clip runtimes in order to know when to kill the power (as mentioned earlier, the ESP32 has no idea when a sound finishes playing unless you tell it the duration ahead of time). Alas, the single-sound version that exists now is more reminiscent of my panic button’s spiritual predecessor, the Staples Easy button.
- Had I hashed out the details of the email sending a bit earlier, I would’ve liked to include a bit more variety in the messages. 10 is a good enough number but, like with the sounds, more is always better.
- Some additional or more-complicated blink patterns for the LEDs could be fun. There’s only so much that can be done with the one in the button, but the four that backlight the lithophane are individually controllable so it’s a bit wasteful to flash them in unison.
- When the audio module is first powered, there’s a “pop” output to the speakers. Real amplifiers typically solve this by including a protection relay between the amp output and speaker leads. I thought a relay would be overkill for this application and couldn’t think of a simple/solid-state way to deal with it, so the “pop” remains. Not the end of the world, but something that could be polished a bit.
- Finally, and I actually fixed this in later revisions to the 3D models, but originally the “PANIC” lithophane was one single thickness and color. The new lithophane has a step cut out around the perimeter of the front face so that it matches the “frame” present on the core. That means that the new lithophane is flush with both the front and inner surfaces of the shell. By printing it flat (vs standing on its long edge), you can easily define a filament change at a certain height in your slicer, thus enabling a white “diffuser” layer covered with the same color as the shell in order to improve the contrast of the lighted lithophane and make it look more like part of the shell itself.
In conclusion
This project has been the most complicated thing I’ve ever made. Between the modeling involved, creating PCBs (a first for me), testing everything out, and now writing this post (and accompanying detailed assembly guide), I can’t think of another project that has been as involved—or as fun—as this one has. Something similar could be said about my career to this point: while it’s certainly had its ups, downs, late nights and early mornings, I’ve met and worked with some great people and even managed to have some fun with them along the way (in between the back-breaking jobs and 14-hour days, of course). While my auction days are behind me now, I can rest easy knowing that this panic button will remain in my place as a beacon of calm for years to come.
Links
- I also wrote an assembly guide, on the off chance you want to build one of these things.
- The following are linked in the assembly guide, but included here for completeness:
Updates
- (4/24/2022): In hindsight, 30 presses was FAR too high of a threshold for the button to start considering other email recipients. We’re going on 4 months now and seem to have stalled out in the high twenties weeks ago. Oh well, live and learn I guess **shrug**.